Installation
Basic Commands
- run
terraform init - run
terraform planto see upcoming changes - run
terraform state listto see all the resource created - run
terraform applyto apply the changes - run
terraform state show aws_vpc.test_vpc(as shown in the list cmd above), we get the json preview file. - run
terraform destroy -auto-approveto destroy everything we have created
Provider
terraform { required_providers { aws = { source = "hashicorp/aws" version = "~> 3.0" } } } provider "aws" { region = "ap-northeast-1" }
Backend
A backend in Terraform defines where and how the terraform state file (terraform.tfstate) is stored and accessed. The state file is crucial as it keeps track of all resources Terraform manages.
Remote Backend (Terraform Cloud)
Free up to 5 users, but it costs $20/user per month beyond that.
terraform { backend "remote" { organization = "devops-directive" workspaces { name = "terraform-course" } } required_providers { aws = { source = "hashicorp/aws" version = "~> 3.0" } } } provider "aws" { region = "us-east-1" }
Self-Managed Backend (S3)
DynamoDB is used to lock the state file when there is deployment undergone.
resource "aws_s3_bucket" "terraform_state" { bucket = "devops-directive-tf-state" # REPLACE WITH YOUR BUCKET NAME force_destroy = true } resource "aws_s3_bucket_versioning" "terraform_bucket_versioning" { bucket = aws_s3_bucket.terraform_state.id versioning_configuration { status = "Enabled" } } resource "aws_s3_bucket_server_side_encryption_configuration" "terraform_state_crypto_conf" { bucket = aws_s3_bucket.terraform_state.bucket rule { apply_server_side_encryption_by_default { sse_algorithm = "AES256" } } } resource "aws_dynamodb_table" "terraform_locks" { name = "terraform-state-locking" billing_mode = "PAY_PER_REQUEST" hash_key = "LockID" attribute { name = "LockID" type = "S" } }
then we can declare our remote backend in S3 by
terraform { # Terraform will make use of LockID to create lock, backend "s3" { bucket = "tf-state" key = "terraform.tfstate" region = "ap-northeast-1" dynamodb_table = "terraform-state-locking" encrypt = true } required_providers { aws = { source = "hashicorp/aws" version = "~> 3.0" } } }
Note that we cannot pass any reference to dynamodb_table (as it will be being intialized at terraform init stage. Namely, nothing is created yet, the resource reference cannot be created out of thin air), therefore we can only hard-code the name "terraform-state-locking" in the configuration.
Internally terraform will create lock in the following operations:
lock_operations = { 'terraform init': False, # No lock needed 'terraform plan': True, # Creates lock 'terraform apply': True, # Creates lock 'terraform destroy': True, # Creates lock 'terraform import': True # Creates lock }
and it is not important to set TTL to the lock because
lock_management = { normal_scenario: { lock_creation: "At start of operation", lock_removal: "Automatically after operation completes", }, failure_scenario: { solution: "Use terraform force-unlock", command: "terraform force-unlock <LOCK_ID>", }, };
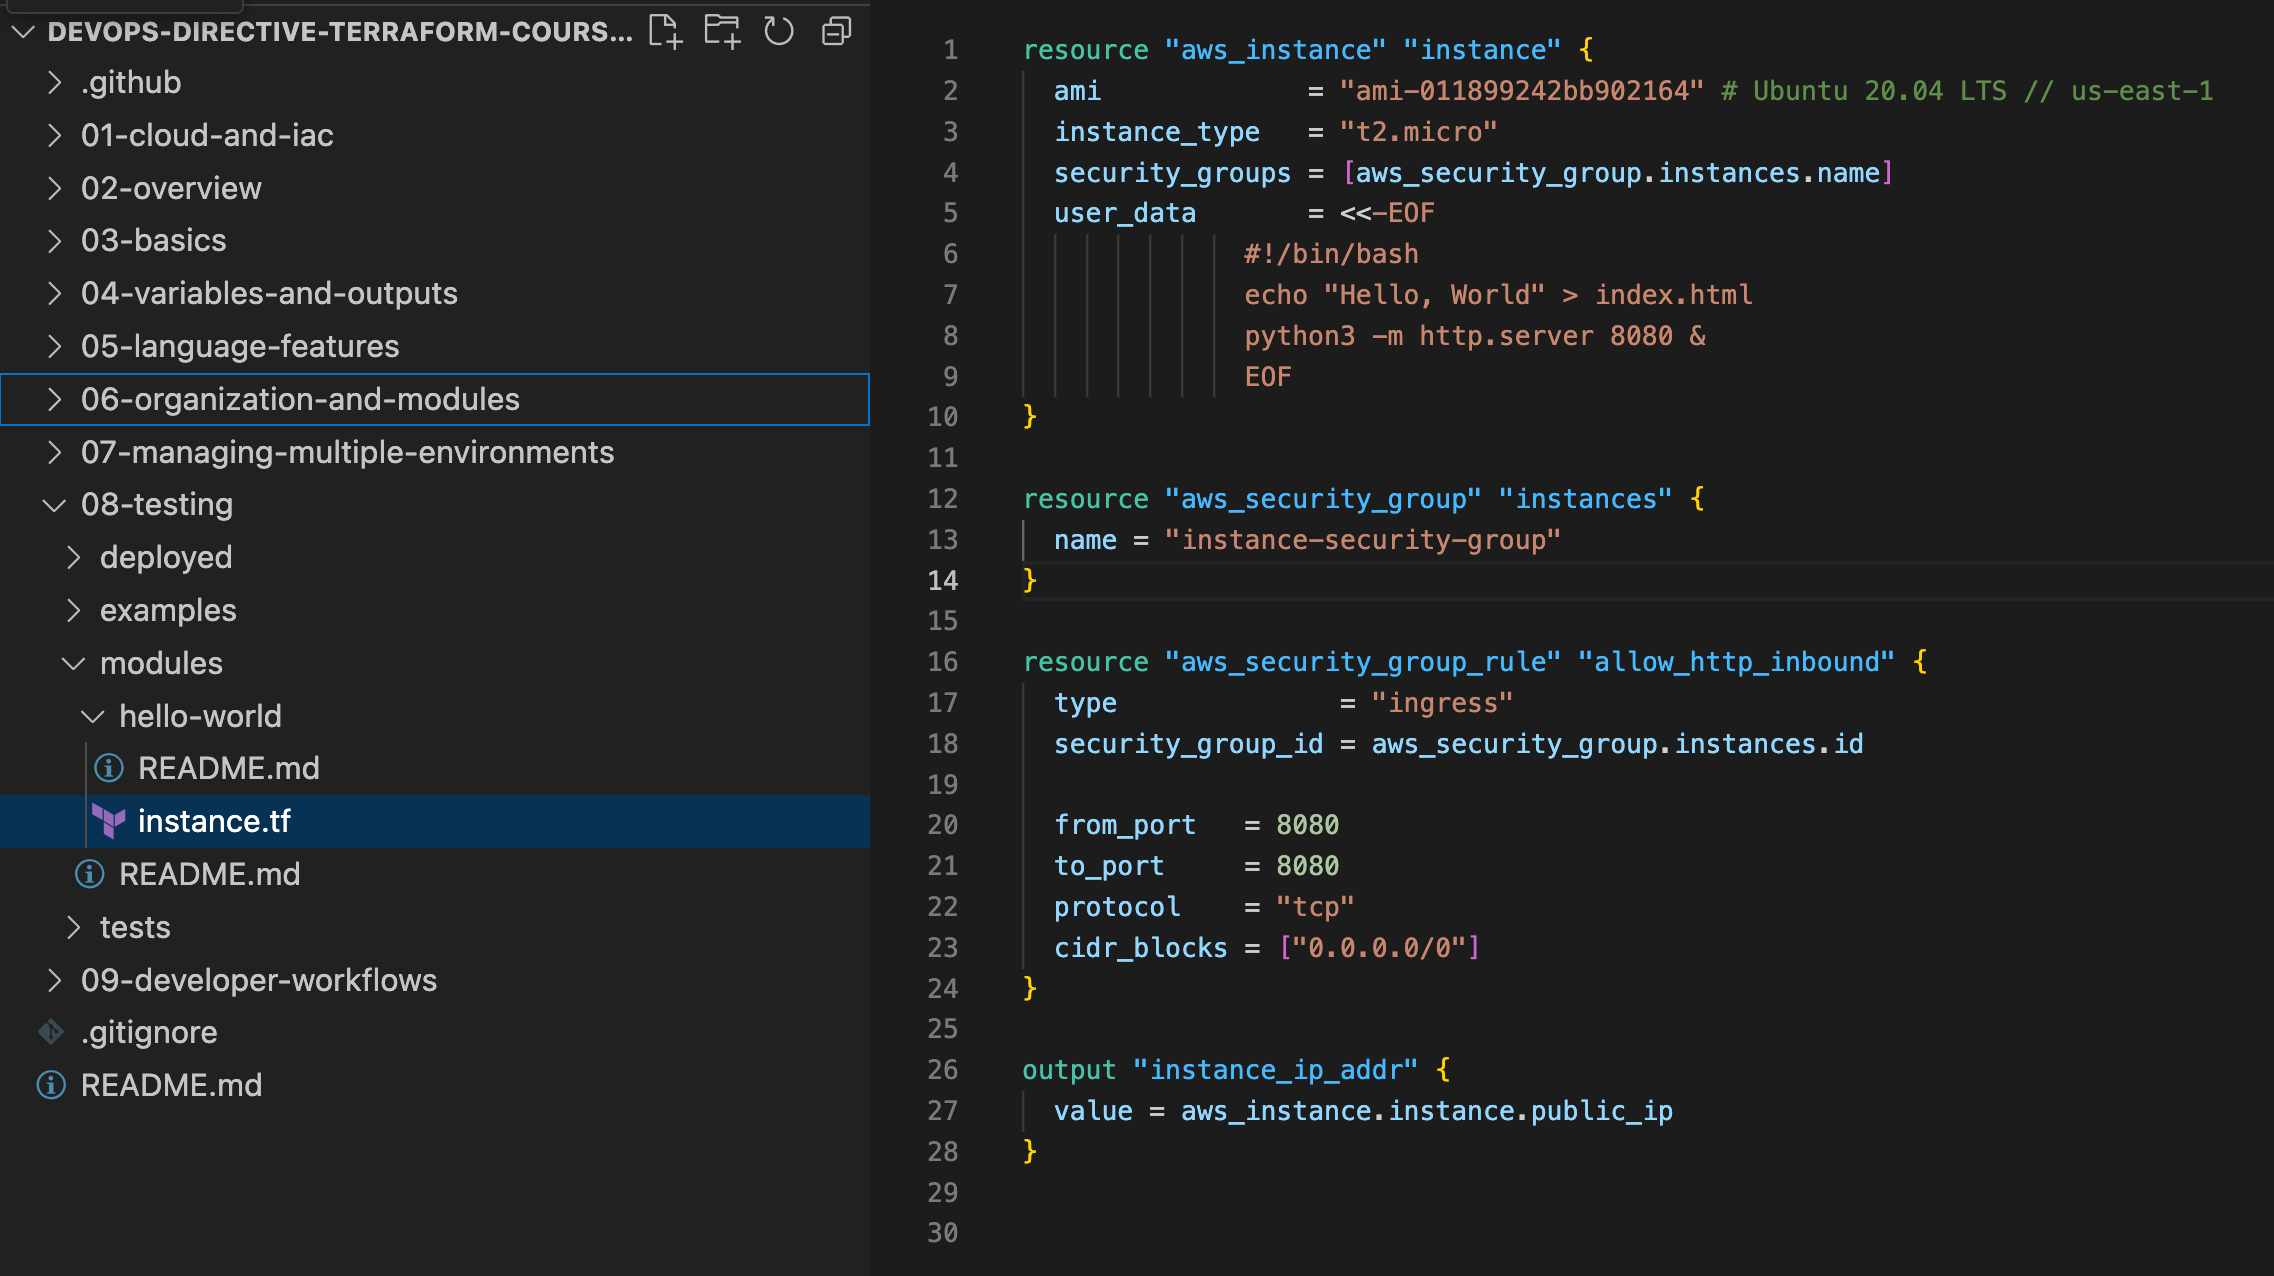
Security Groups
Create a security group
We create a security group by
resource "aws_security_group" "instances" { name = "instance-security-group" }
Set up rules for security groups
Single port
resource "aws_security_group_rule" "alb_inbound_rules" { type = "ingress" security_group_id = aws_security_group.alb.id source_security_group_id = aws_security_group.lambdas.id from_port = 8080 to_port = 8080 protocol = "tcp" }
By default even to allow single port to be accessible, we have to specify bothfrom_port and to_port
All traffic
resource "aws_security_group_rule" "alb_inbound_rules" { type = "ingress" security_group_id = aws_security_group.alb.id source_security_group_id = aws_security_group.lambdas.id from_port = 8080 to_port = 8080 protocol = "-1" # -1 means all protocols }
Assign range of accessible IPs
resource "aws_security_group_rule" "alb_inbound_rules" { type = "ingress" security_group_id = aws_security_group.alb.id source_security_group_id = aws_security_group.lambdas.id from_port = 8080 to_port = 8080 protocol = "-1" # -1 means all protocols cidr_blocks = ["0.0.0.0/0"] }
Assign an aws resource a security group
resource "aws_instance" "instance_2" { ami = "ami-011899242bb902164" # Ubuntu 20.04 LTS // us-east-1 instance_type = "t2.micro" security_groups = [aws_security_group.instances.name] user_data = <<-EOF #!/bin/bash echo "Hello, World 2" > index.html python3 -m http.server 8080 & EOF }
data block
data blockA data block in Terraform is used to query and fetch data from existing resources that you didn't create with Terraform. It's a way to reference existing infrastructure or get information from your provider.
Examples
-
The following says that we query for
aws_vpcdata "aws_vpc" "default_vpc" { default = true }which is the default one, the queried result can be accessed by
default_vpc. -
The following says that we query for
subnet_idsdata "aws_subnet_ids" "default_subnets" { vpc_id = data.aws_vpc.default_vpc.id }which belongs to our target vpc
default_vpc, the queried result can be accessed bydefault_subnets.
Target Groups
Create a target group
resource "aws_lb_target_group" "lambda_tg" { name = "lambda-target-group" target_type = "lambda" }
Create a target group for ECS service
Note that ECS services are VPC-bound resources. Namely, these services are accessed internally within the VPC, therefore there is no need for HTTPS portocol.
# For Fargate (most common) resource "aws_lb_target_group" "ecs" { name = "ecs-target-group" port = 9090 # container port protocol = "HTTP" target_type = "ip" # Use "ip" for Fargate vpc_id = aws_vpc.main.id health_check { path = "/health" port = 80 } } # ECS Service will automatically register tasks to target group resource "aws_ecs_service" "main" { name = "my-service" cluster = aws_ecs_cluster.main.id task_definition = aws_ecs_task_definition.main.arn desired_count = 2 network_configuration { subnets = aws_subnet.private[*].id security_groups = [aws_security_group.ecs_tasks.id] } load_balancer { target_group_arn = aws_lb_target_group.ecs.arn container_name = "my-container" # Must match container name in task definition container_port = 80 # Must match container port in task definition } }
Query for existing lambda functions
variable "lambda_function_name" { description = "Name of the Lambda function created by Serverless" type = string } data "aws_lambda_function" "backend_in_prod" { function_name = var.lambda_function_name }
This variable will be reused somewhere, therefore it is still meaningful to store it as a string enum.
Attach a lambda function to the target group
resource "aws_lb_target_group_attachment" "lambda_tg_attachment" { target_group_arn = aws_lb_target_group.lambda_tg.arn target_id = aws_lambda_function.backend_in_prod.arn }
Load-Balancers
Create a load-balancer
resource "aws_lb" "load_balancer" { name = "web-app-lb" load_balancer_type = "application" subnets = data.aws_subnet_ids.default_subnet.ids security_groups = [aws_security_group.alb.id] internal = false # Optional, this is the default }
The load-balancer is internet-facing by default, we need to set it false if we wish only internal load balancer.
Add listeners
List a list of avaialable domain for certs
data "aws_acm_certificates" "all" { domain_name_regex = ".*" # use domain_name = "example.com" if we are certain about the domain statuses = ["ISSUED"] }
Now we can run terraform apply to initialize the variable, and then run
terraform state show data.aws_acm_certificates.all
to get a list of available domain names (with certificate).
Add target group (of lambda function) to a listener with cert
Assume that we add a target group that executes a lambda function, we can write:
# Create the HTTPS listener resource "aws_lb_listener" "my_backend_listener" { load_balancer_arn = aws_lb.my_alb.arn port = "443" protocol = "HTTPS" ssl_policy = "ELBSecurityPolicy-2016-08" # AWS recommended policy certificate_arn = aws_acm_certificate.cert.arn # the data block default_action { type = "forward" target_group_arn = aws_lb_target_group.my_tg.arn } }
resource "aws_lambda_permission" "allow_alb" { statement_id = "AllowALBInvoke" action = "lambda:InvokeFunction" function_name = var.lambda_function_name principal = "elasticloadbalancing.amazonaws.com" source_arn = aws_lb_target_group.lambda_tg.arn }
We talk about principal in the next section:
Principals
In AWS IAM context, a principal is the entity (who/what) that is being allowed to perform an action. It's essentially identifying "who" is being granted permission.
In short, principal is the same as the type of resource. Common resources:
API Gateway apigateway.amazonaws.com Application Load Balancer elasticloadbalancing.amazonaws.com CloudWatch Events events.amazonaws.com CodeBuild codebuild.amazonaws.com Lambda lambda.amazonaws.com S3 s3.amazonaws.com SNS sns.amazonaws.com SQS sqs.amazonaws.com Systems Manager ssm.amazonaws.com Secrets Manager secretsmanager.amazonaws.com
Variables and Outputs
String
variable "instance_type" { description = "ec2 instance type" type = string default = "t2.micro" }
Local Variable
locals { dns_zone_id = var.create_dns_zone ? aws_route53_zone.primary[0].zone_id : data.aws_route53_zone.primary[0].zone_id subdomain = var.environment_name == "production" ? "" : "${var.environment_name}." }
Outputs
Outputs serve several purposes including computing/exposing derived data:
output "full_domain_name" { value = "${aws_instance.app.name}.${data.aws_route53_zone.main.name}" }
Practical Example
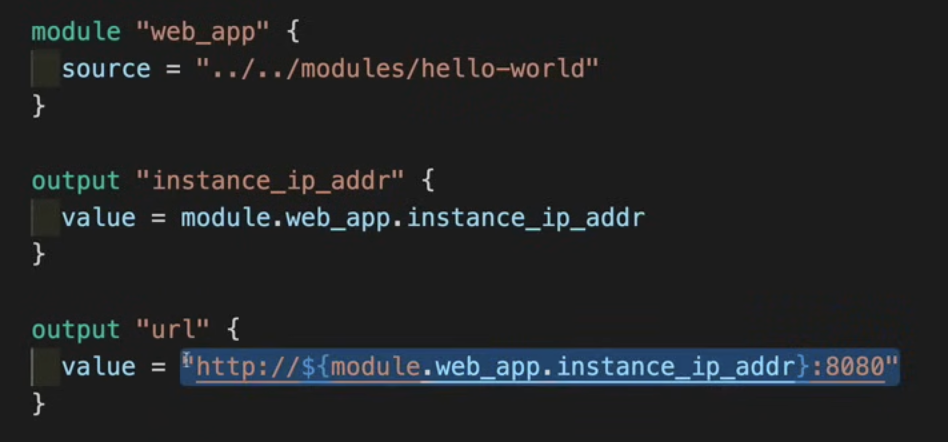
Here we have used module.web_app.instance_ip_addr, this instance_ip_addr is defined inside the output block of the hello-world module:
Recall that in terraform a module is the same as a folder.
Setting input variables with priorities
The priority list
In order of priority: (↓ means the override direction)
- Command line
-varor-var-file - ↓
*.tfvarsfiles - ↓
terraform.tfvarsfiles (global default constants) - ↓
TF_VAR_<name>environment variables (access it byvar.<name>) - ↓ Default value in declaration block
- ↓ Manual entry during plan/apply
terraform.tfvars
We place global constant here:
instance_name = "hello-world" ami = "ami-011899242bb902164" # Ubuntu 20.04 LTS // us-east-1 instance_type = "t2.micro"
*.tfvars + terraform apply -var-file=...
*.tfvars + terraform apply -var-file=...Here our value will override those in terraform.tfvars, suitable for situation like DEV, UAT and PROD
# some.tfvars instance_name = "hello-world-2"
Now we apply to override instance_name in terraform.tfvars by
terraform apply -var-file=some.tfvars
variables.tf and terraform apply -var=...
variables.tf and terraform apply -var=...variables.tf is for dynamic variables. This is suitable if we want to inject variable in runtime like from github secret or AWS secret manager.
Assume that we have declared the following variables in variables.tf:
variable "db_user" { description = "username for database" type = string default = "foo" } variable "db_pass" { description = "password for database" type = string sensitive = true }
Now we execute
terraform apply -var="db_user=value_1" -var="db_pass=value_2"
Our resources can get access to the variables by var.db_user, or var.db_pass, etc once terraform apply -var=... is executed.
outputs.tf
output "instance_ip_addr" { value = aws_instance.instance.private_ip } output "db_instance_addr" { value = aws_db_instance.db_instance.address }
Meta-Arguments
depends_on
depends_onresource "aws_iam_role" "example { name = "example" assume_role_policy = "..." } resource "aws_instance" "example" { ami = "..." instance_type = "t2.micro" iam_instance_profile = aws_iam_instance_profile.example depends_on = [ aws_iam_role_policy.example ] }
count
countresource "aws_instance" "server" { count = 4 ami = "..." instnace_type = "t2.micro" tags = { name = "Server ${count.index}" } }
for_each
for_eachlocals { subnet_ids = toset([ "subnet_aaaaa", "subnet_bbbbb" ]) } resource "aws_instance" "server" { for_each = local.subnet_ids ami = "..." instnace_type = "t2.micro" subnet_id = each.key tags = { Name = "Server {each.key}" } }
lifecycle
Lifecycle meta-arguments control how Terraform treats particular resources.
create_before_destroy
Specifying create_before_destroy = true indicates that if the resource does need to be destroyed, Terraform should first provision its replacement before destroying the deprecated resource. This can be useful for things such as zero downtime deployments.
resource "some_resource" "example" { # ... lifecycle { create_before_destroy = true } }
ignore_changes
Sometimes an entity outside of terraform will automatically modify a resource (e.g. adding metadata, etc...). The ignore_changes argument allows you to ignore specific types of resource changes to prevent this from causing Terraform to attempt to revert those changes.
prevent_destroy
prevent_destroy provides an additional stopgap against accidentally destroying resources with terraform. If set to true, Terraform will reject any attempt to destroy that resource.
Modules
Project Structure
Treat main.tf as an entrypoint of each module, our root project has the following structure
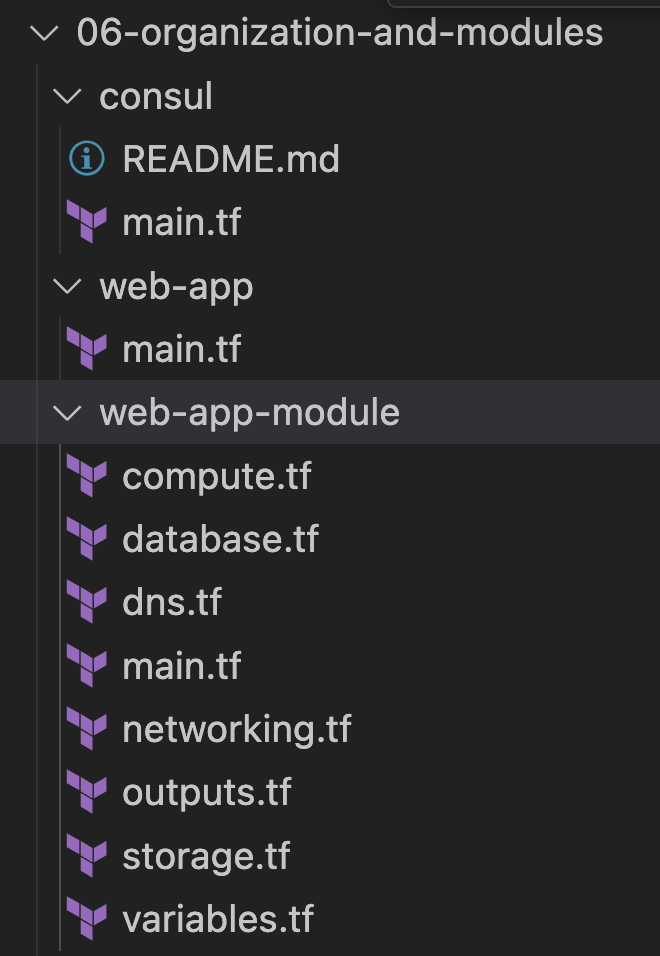
-
The naming convention
main.tfis not fixed, any.tffiles inside the folder will be looped, therefore a module should be seen as a folder. -
Now at
06-organization-and-modules/, we canterraform initto initiate modules and resources. -
We can organize resources into an individual
.tffile as a logical group. -
When we define modules we usually don't define those
*.tfvarsfiles as we will pass those arguments when we use the module. -
There is no need to provide terraform backend and terraform provider in a module as we will declare it in our main project.
Consume a module with arguments
Inside of web-app/main.tf we apply the module defined in web-app-module/ by:
module "web_app_1" { source = "../web-app-module" # Input Variables bucket_prefix = "web-app-1-data" domain = "devopsdeployed.com" app_name = "web-app-1" environment_name = "production" instance_type = "t2.micro" create_dns_zone = true db_name = "webapp1db" db_user = "foo" db_pass = var.db_pass_1 } module "web_app_2" { source = "../web-app-module" # Input Variables bucket_prefix = "web-app-2-data" domain = "anotherdevopsdeployed.com" app_name = "web-app-2" environment_name = "production" instance_type = "t2.micro" create_dns_zone = true db_name = "webapp2db" db_user = "bar" db_pass = var.db_pass_2 }
where the arguments are variables defined in those web-app-module/variables.tf (technically it can be a variable defined in any .tf file).
Also terraform will skim through all the files of the form web-app-module/**/*.tf and init the resources defined.
Manage Multiple Environments
Two main approches:
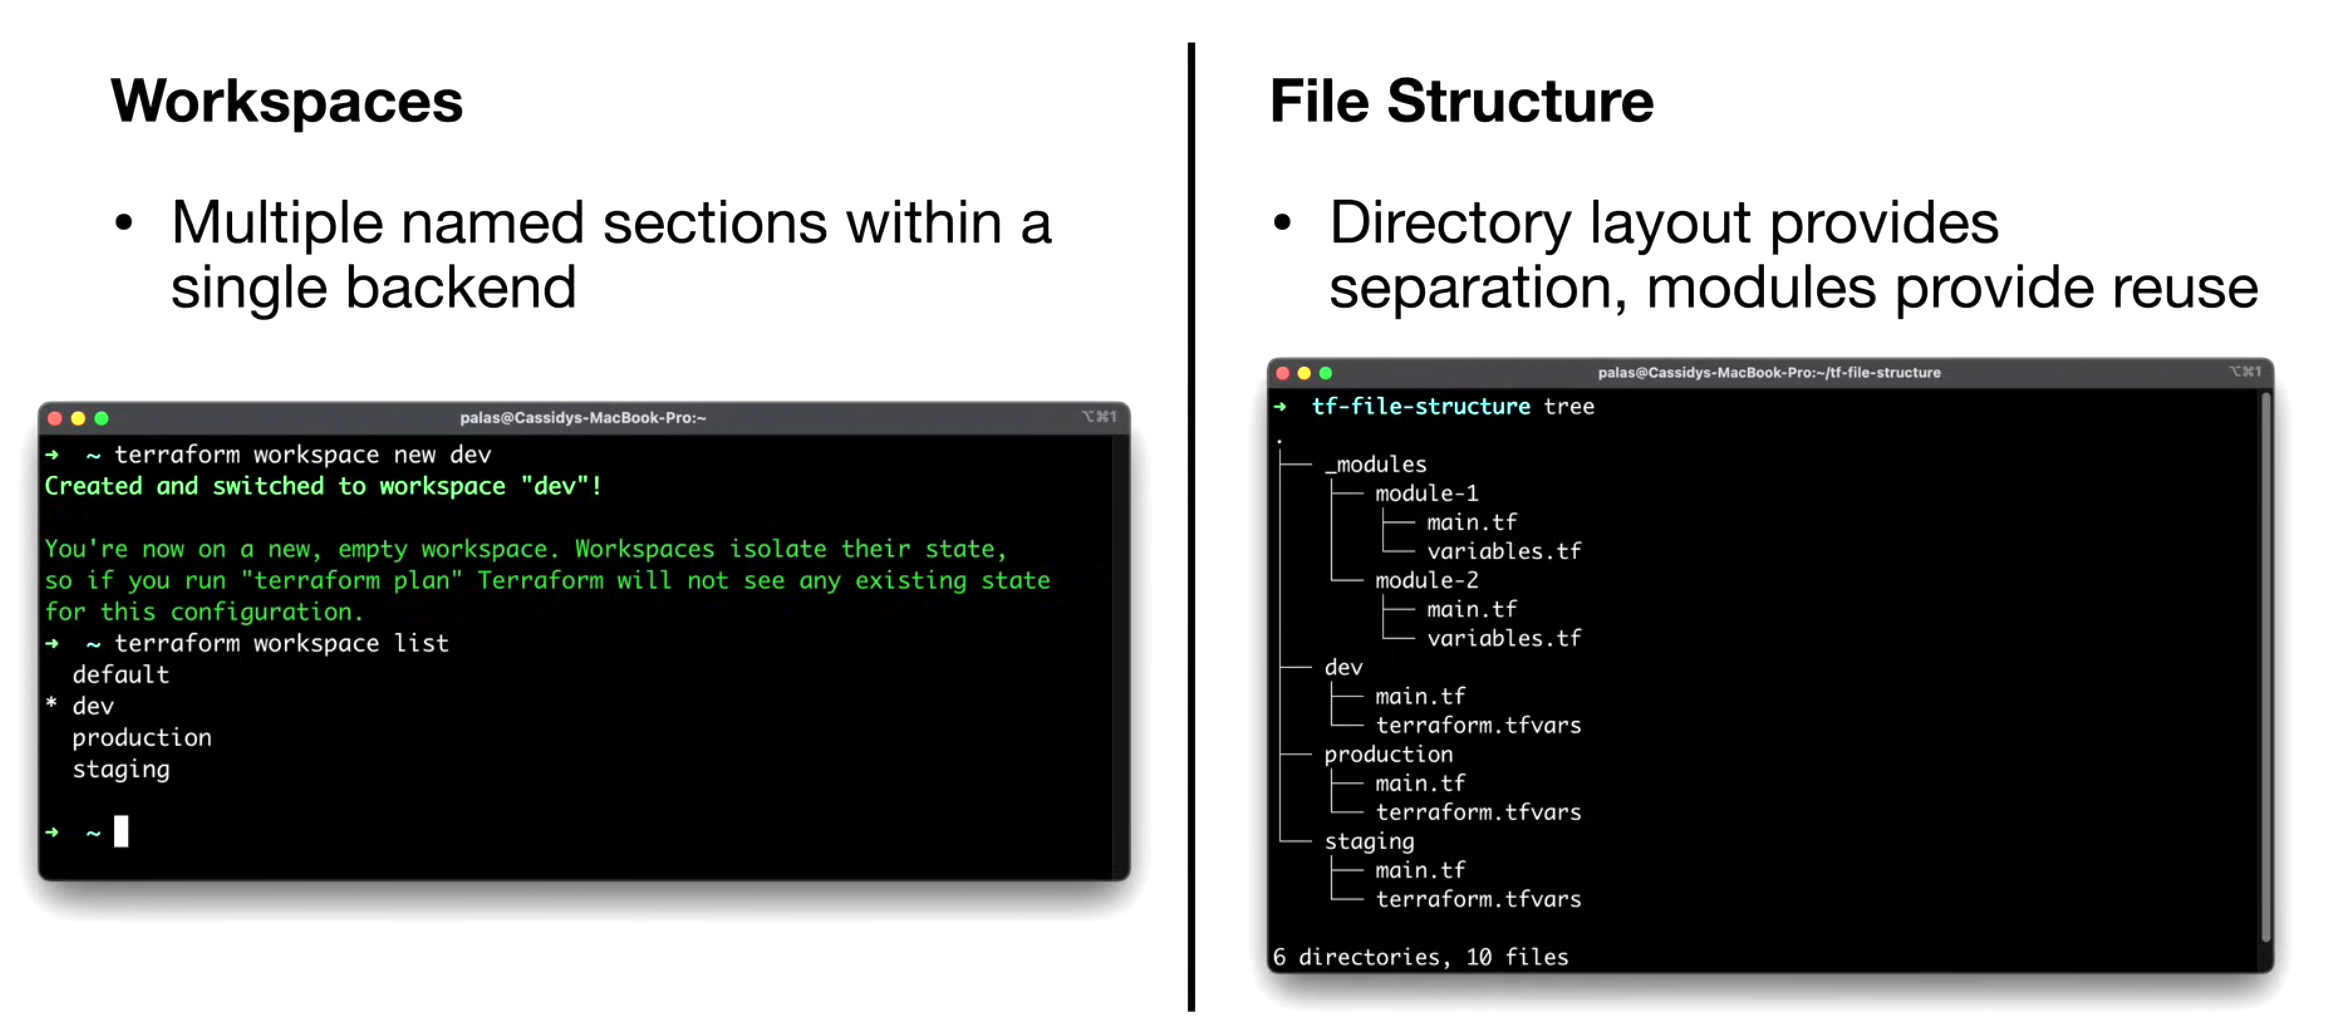
Workspaces
When to use it over modularizing into folders
- When there is absolutely no configuration difference
- When we want to test an infrastructure and later delete it conveniently
List all workspaces
terraform init terraform workspace list
We will get the default workspace by defualt.
Create a new workspace
terraform workspace new production
Now we have created and switched to a new workspace, if we execute
terraform apply
we will init and create those new resources.
Switch to another workspace
terraform workspace select prod
Destroy a workspace
To destroy everything, we simply execute
terraform destroy
in the workspace.
File Structure
Folders
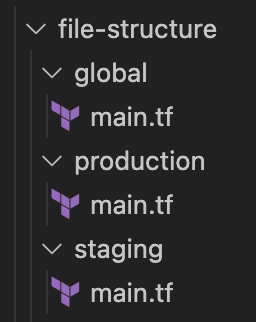
-
Here global contains those resources that are shared by different environments.
-
Now to deploy resources in production, we simply
cdinto theproduction/directory and executeterraform init terraform apply
Testing Terraform Code
terratest (in golang)
package test import ( "crypto/tls" "fmt" "testing" "time" "github.com/gruntwork-io/terratest/modules/http-helper" "github.com/gruntwork-io/terratest/modules/terraform" ) func TestTerraformHelloWorldExample(t *testing.T) { // retryable errors in terraform testing. terraformOptions := terraform.WithDefaultRetryableErrors(t, &terraform.Options{ TerraformDir: "../../examples/hello-world", }) defer terraform.Destroy(t, terraformOptions) terraform.InitAndApply(t, terraformOptions) instanceURL := terraform.Output(t, terraformOptions, "url") tlsConfig := tls.Config{} maxRetries := 30 timeBetweenRetries := 10 * time.Second http_helper.HttpGetWithRetryWithCustomValidation( t, instanceURL, &tlsConfig, maxRetries, timeBetweenRetries, validate, ) } func validate(status int, body string) bool { fmt.Println(body) return status == 200 }
-
run
go mod downloadto install all the dependencies listed ingo.modfile:// go.mod module hello-world go 1.15 require ( github.com/gruntwork-io/terratest v0.34.8 github.com/stretchr/testify v1.7.0 )recall that if we create a project from scratch, we
go mod init <project-name>andgo get <module-name>.
Additional Tools
Terragrunt
- Minimizes code repetition
- Enables multi-account separation (improved isolation/security)
cloud-nuke
- Easy cleanup of cloud resources
Makefiles
- Prevent human error