UV is a package manager that can replace the virtual environment manager such as conda and pyenv.
For mac user we simply execute:
Copy 1 curl -LsSf https://astral.sh/uv/install.sh | sh We can execute uv --version to check whether uv is installed.
1.3. pyproject.toml and .python-version
1.3.1. uv sync from existing pyproject.toml
With the presence of
pyproject.toml for definition all dependencies and their version.python-version for definition of python version
we can execute
to install all specified dependences. The directory .venv/ will be created to install everything needed to launch a virtual environment.
1.3.2. add specific package
The command
will automatically update the pyproject.toml and uv.lock for for us (just like package.json and package.lock.json).
1.4. How to Set the name of the Virtual Environment Generated by a uv project
We execute
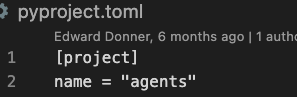
Copy 1 uv project metadata --set name = "agents" It will set a value in pyproject.toml:
Now we can select agents from the python interpretor or from the kernels of jupyter notebook.
1.5. How to Generatge the good old requirement.txt if we still need it?
The file requirement.txt is not strictly necessary if we are using uv throughoutly. If someone is still using conda or pyenv for virtual environments, then export one for them:
Copy 1 uv pip compile pyproject.toml -o requirements.txt
2. Virtual Environment by uv
uv automatically manages a virtual environment:
✅ Creates a .venv directory (or custom location)
✅ Installs all dependencies there
✅ Isolates your project from system Python
✅ You don't manually create it—uv sync does
The command
automatically:
Creates or updates .venv/
Installs all dependencies from pyproject.toml
Ready to use
2.2. Execute python Script in uv virtual environment
python something.py is now replaced by
3. Sync to uv Project via requirements.txt
First uv init and change to correct python version. Then create a file called sync_to_uv.sh and execute it:
Copy 1 #!/bin/bash
2
3 # Script to install from requirements.txt and sync to pyproject.toml
4 # Usage: ./sync_to_uv.sh [requirements.txt]
5
6 REQUIREMENTS_FILE = " ${1 :- requirements.txt} "
7
8 if [ ! -f " $REQUIREMENTS_FILE " ] ; then
9 echo "❌ Error: $REQUIREMENTS_FILE not found"
10 exit 1
11 fi
12
13 if [ ! -f "pyproject.toml" ] ; then
14 echo "❌ Error: pyproject.toml not found"
15 exit 1
16 fi
17
18 echo "� Step 1: Ensuring virtual environment exists..."
19 if [ ! -d ".venv" ] ; then
20 echo " Creating .venv..."
21 uv venv
22 fi
23
24 echo ""
25 echo "📦 Step 2: Installing packages from $REQUIREMENTS_FILE ..."
26 uv pip install -r " $REQUIREMENTS_FILE "
27
28 if [ $? -ne 0 ] ; then
29 echo "❌ Failed to install packages"
30 exit 1
31 fi
32
33 echo ""
34 echo "🔍 Step 2: Reading installed packages..."
35
36 # Get installed packages in format: package==version
37 INSTALLED = $( uv pip freeze | grep -v "^-e " | sort )
38
39 # Format for pyproject.toml
40 TMP_DEPS = $( mktemp )
41 echo " $INSTALLED " | sed 's/==/>=/g' | awk '{print " \"" $0 "\","}' > " $TMP_DEPS "
42
43 # Remove trailing comma from last line
44 sed -i '' '$ s/,$//' " $TMP_DEPS "
45
46 echo ""
47 echo "✏️ Step 4: Updating pyproject.toml..."
48
49 # Create temporary output file
50 TMP_FILE = $( mktemp )
51
52 # Read through pyproject.toml and replace dependencies
53 IN_DEPS = 0
54 while IFS = read -r line ; do
55 if [ [ " $line " =~ ^dependencies [ [ :space: ] ] * = [ [ :space: ] ] * \ [ ] ] ; then
56 # Handle both "dependencies = [" and "dependencies = []"
57 echo "dependencies = [" >> " $TMP_FILE "
58 cat " $TMP_DEPS " >> " $TMP_FILE "
59 echo "]" >> " $TMP_FILE "
60 IN_DEPS = 1
61 # If it's on one line (dependencies = []), skip it entirely
62 if [ [ " $line " =~ \ ] $ ] ] ; then
63 IN_DEPS = 0
64 fi
65 elif [ [ $IN_DEPS -eq 1 && " $line " =~ ^ \ ] ] ] ; then
66 # Already closed above, skip this line
67 IN_DEPS = 0
68 elif [ [ $IN_DEPS -eq 0 ] ] ; then
69 echo " $line " >> " $TMP_FILE "
70 fi
71 # else: skip lines inside the old dependencies array
72 done < "pyproject.toml"
73
74 # Replace original file
75 mv " $TMP_FILE " "pyproject.toml"
76 rm " $TMP_DEPS "
77
78 echo "✅ Successfully synced $( echo " $INSTALLED " | wc -l | tr -d ' ' ) packages to pyproject.toml"
79 echo ""
80 echo "📦 Sample dependencies added:"
81 echo " $INSTALLED " | head -10
82 TOTAL = $( echo " $INSTALLED " | wc -l | tr -d ' ' )
83 if [ " $TOTAL " -gt 10 ] ; then
84 echo " ... and $( expr $TOTAL - 10 ) more"
85 fi
86
87 echo ""
88 echo "🔄 Step 5: Running uv sync to update lock file..."
89 uv sync
90
91 if [ $? -eq 0 ] ; then
92 echo ""
93 echo "✅ Complete! Your environment is now synced with pyproject.toml and uv.lock"
94 else
95 echo ""
96 echo "⚠️ Warning: uv sync had issues, but pyproject.toml was updated"
97 fi
Show More (97 lines) This shell script will
Install all the packages into the virtual environment according to the requirements.txt, and then;
Sync back the installed packages into the toml file of the uv project.
Finally it uv sync to update the lock file to version the installed package versions.