Here Annotated is a special syntax to provide extra information to the type.
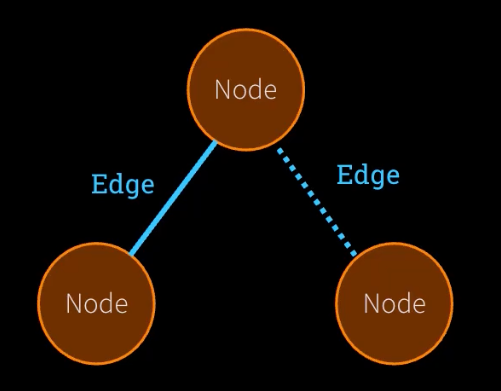
1.2. Node and Edges
Nodes are python functions that represent agent logic. They receive the current state as input, do something, and return an updated attribute of the entire state.
Remark. The state will be upated immediately before it reaches to another node. We explain how the state gets updated in 〈1.3. Reducer Pattern in LangGraph〉.
Edges are python functions that determine which node to execute next based on the state, they can be conditional or fixed.
1.3. Reducer Pattern in LangGraph
1.3.1. Example of reducer from react
In old-fasioned react redux a reducer satisfies the interface:
where add_messages is a function (again from langgraph) that appends [message] to the list of messages, and that's how update is done.
LangGraph has internally controlled the return type of how Agent returns, add_messages also has internally abstracted how update was executed behind the scene, but under the hood these messages are either:
AIMessage from Agent
HumanMessage from Agent
SystemMessage from Agent
ToolMessage from ToolNode
which we can import from langchain_core.messages.
By default without any annotation, the update is simply an assignment, replacing the old value.
It is not as magical as giving it a str explaning what to do and it does the magical update for us.
2. What is LangSmith? Why do we need it?
Langsmith is a tool bundled with langgraph to trace the execution flow of our graph. To add this tracing:
You can get the API key and required env variables via
Put those variables into our .env file:
Now when we build a graph with langchain's Tool and StateGraph. It will automatically log down the detail such as the execution of each node and each condition determined by the edges to whether or not to execute next node.
3. Run an Agent by LangGraph
3.1. Define Tools
3.1.1. tool_search (Google Api Wrapper)
Make sure to register an account from https://serper.dev/ (but nothttps://serpapi.com/), then you should be able to get a free tier API key with a limit of 250 API calls.
Set this API key in .env with key name SERPER_API_KEY:
1from langchain.agents import Tool
2from langchain_community.utilities import GoogleSerperAPIWrapper
34# can skip the keyword argument:5serper = GoogleSerperAPIWrapper(serper_api_key=os.getenv("SERPER_API_KEY"))67tool_search =Tool(8 name="search",9 func=serper.run,10 description="Useful for when you need more information from an online search"11)
We can test this tool by tool_search.invoke("What is calculus"), and we get:
1'Calculus is the mathematical study of continuous change, in the same way that geometry is the study of shape, and algebra is the study of generalizations of ... Calculus is a set of methods and tools used to mathematically investigate and describe how things change, usually by way of cutting up that ... The first thing that calculus does for us it allows us to find the precise exact area of crazy shapes any shape that you want. Calculus is a branch of mathematics that studies the rate of change; it is used to model systems where there is change. Calculus is the study of how things change. It provides a framework for modeling systems in which there is change, and a way to deduce the predictions of such ... Put in the most simple terms, calculus is the study of rates of change. Calculus is one of many mathematics classes taught in high school and college. Calculus, branch of mathematics concerned with instantaneous rates of change and the summation of infinitely many small factors. Calculus is a branch of mathematics that studies continuous change; deals with properties of derivatives and integrals using methods based on the summation of ... Calculus is the mathematical study of change, in the same way that geometry is the study of shape and algebra is the study of operations and their application ... The word Calculus comes from Latin meaning "small stone", because it is like understanding something by looking at small pieces. Differential Calculus cuts ...'
3.1.2. tool_send_email
1import sendgrid
2import os
3from sendgrid.helpers.mail import Mail, Email, To, Content
4from agents import Agent, Runner, trace, function_tool
56defsend_email(text:str):7 sg = sendgrid.SendGridAPIClient(api_key=os.environ.get('SENDGRID_API_KEY'))8# Change to your verified sender9 from_email = Email("james.lee@wonderbricks.com")10 to_email = To("machingclee@gmail.com")# Change to your recipient11 content = Content("text/plain", text)12 mail = Mail(from_email, to_email,"Answer to your question", content).get()13 response = sg.client.mail.send.post(request_body=mail)14print(response.status_code)151617tool_send_email = Tool(18 name="send_email",19 func=send_email,20 description="useful for when you want to send an email with text as content"21)
3.2. Define get_llm by AzureOpenAI Models
1from langchain_openai import AzureChatOpenAI
23defget_llm():4 llm = AzureChatOpenAI(5 azure_deployment=os.getenv("AZURE_OPENAI_MODEL"),6 api_version=os.getenv("AZURE_API_VERSION","2024-10-21"),7 azure_endpoint=os.getenv("AZURE_OPENAI_ENDPOINT"),8 api_key=os.getenv("AZURE_OPENAI_API_KEY"),9)10return llm
1112# llm = get_llm() to get a model
Whenever our ToolNode gets exectued, LangGraph appends a ToolMessage to our State["messages"], and the next chatbot node will consume the latest message from the ToolNode for the next iteration.
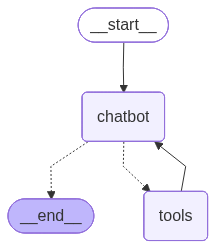
3.3.4. Create Edges
In the following the tools_condition is exactly
looking for the model response saying that the finish_reason=="tool_calls"
then retrieve the call
run the function and provide the results
We have gone through the above process previously in the section Apply the Tools.
LangChain automatically adds the END node for us. Note that dotted lines mean conditional edge. Whether or not to go to the target node depends on the edge condition.
3.4. Execute the Graph via gradio ChatUI
3.4.1. Execution
A raw execution of the graph goes as follows:
1result = graph.invoke({"messages":[2{"role":"user","content":"Hi, I am James"}3]})4print(result['messages'][-1].content)
Usually we would love to wrap it into a chat function and build a gradio chatUI to test the model:
1import gradio as gr
23defchat(user_input:str, history):4 result = graph.invoke({"messages":[{"role":"user","content": user_input}]})5return result["messages"][-1].content
67gr.ChatInterface(chat,type="messages").launch()
3.4.2. The Problem
We see the problem, the state of each of our conversation has not been saved.
This is because we have not persisted the memory of the state by any means for each iteration (in each iteration we run through all of the nodes completely).
It is a simple configuration in langgraph to persist the state of each iteration, this recorder is called a checkpointer:
3.5. Add Memory via checkpointer with Multiple Chat Sessions
Same script as before, we pass our checkpointer when compiling the graph:
1# Steps 1 and 22graph_builder = StateGraph(State)34# Step 35llm = get_llm()6llm_with_tools = llm.bind_tools(tools)78defchatbot(state: State):9print(state)10return{"messages":[llm_with_tools.invoke(state["messages"])]}1112graph_builder.add_node("chatbot", chatbot)13graph_builder.add_node("tools", ToolNode(tools=tools))1415# Step 416graph_builder.add_conditional_edges("chatbot", tools_condition,"tools")17graph_builder.add_edge("tools","chatbot")18graph_builder.add_edge(START,"chatbot")1920# Step 5 (the only extra step)21graph = graph_builder.compile(checkpointer=checkpointer)2223config ={"configurable":{"thread_id":"1"}}2425defchat(user_input:str, history):26 result = graph.invoke({"messages":[{"role":"user","content": user_input}]}, config=config)27return result["messages"][-1].content
2829gr.ChatInterface(chat,type="messages").launch()
Both sqlite and postgresql store the data in a simular format.
In sqlite the results are in linked list format:
where the metadata is our chat data:
3.6.2.2. Retrieve the data
These message can be retrieved from:
1history = graph.get_state_history(config)2last_state =next(history)34messages = last_state.values.get("messages",[])5for msg in messages:6print(f"{msg.type}: {msg.content}")
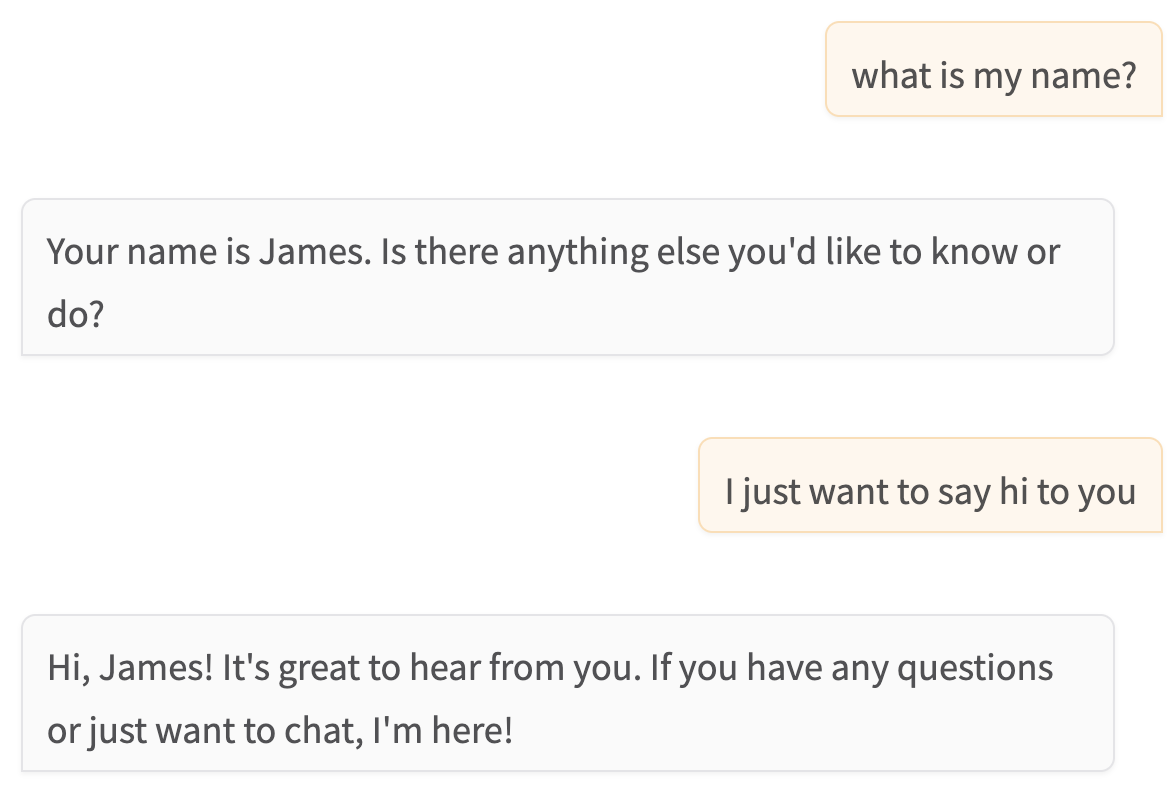
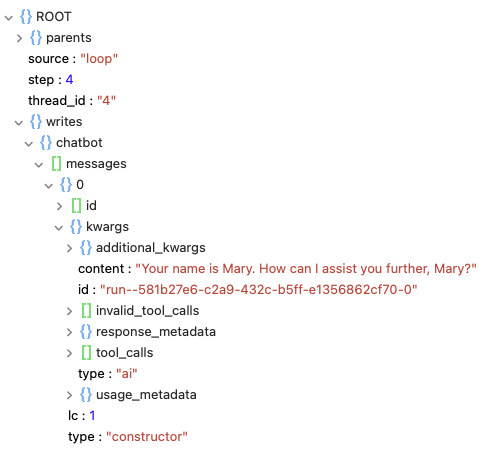
Which results in:
1human: I am james
2ai: Hello James! How can I assist you today?
3human: what's my name?
4ai: Your name is James. How can I help you further?
5human: what is my name?
6ai: Your name is James. Is there anything else you'd like to know or do?
7human: I just want to say hi to you
8ai: Hi, James! It's great to hear from you. If you have any questions or just want to chat, I'm here!
4. Agent with Playwright
4.1. Installation
1uv run playwright install
4.2. nest_asynci for Python Notebook
Since Jupyter notebook is executed inside an event loop, to run another event loop within an event loop we need:
4.2.1. For Non-Windows User
1import nest_asynci
2nest_asyncio.apply()
4.2.2. Windows Users
To avoid NotImplementedError and if we would like to run async LangGraph in the notebook, we need to make a small change that is hacky. We need to do this AFTER installing Playwright (prior cells)
Right click in .venv in the File Explorer on the left and select "Find in folder"
That code should be found in a line of code in a file called kernelapp.py
Comment out the entire else clause that this line is a part of - see the fragment below. Be sure to have the "pass" statement after the ImportError line.
1if sys.platform.startswith("win")and sys.version_info >=(3,8):2import asyncio
34try:5from asyncio import WindowsProactorEventLoopPolicy, WindowsSelectorEventLoopPolicy
6except ImportError:7pass8# not affected9# else:10# if type(asyncio.get_event_loop_policy()) is WindowsProactorEventLoopPolicy:11# WindowsProactorEventLoopPolicy is not compatible with tornado 612# fallback to the pre-3.8 default of Selector13# asyncio.set_event_loop_policy(WindowsSelectorEventLoopPolicy())
Restart the kernel by pressing the "Restart" button
Now we can create a gradio ui to test the agentic result:
1config ={"configurable":{"thread_id":"1"}}23asyncdefchat(user_input:str, history):4 result =await graph.ainvoke({"messages":[{"role":"user","content": user_input}]}, config=config)5return result["messages"][-1].content
67# interface.close() when we want to stop it8interface = gr.ChatInterface(chat,type="messages").launch()
5.2. Define Agent Nodes with Specific pydantic Response
We define "workder node" and "evaluator node" as follows:
1classEvaluatorOutput(BaseModel):2 feedback:str= Field(description="Feedback on the assistant's response")3 success_criteria_met:bool= Field(description="Whether the success criteria have been met")4 user_input_needed:bool= Field(description="True if more input is needed from the user, or clarifications, or the assistant is stuck")56worker_llm = get_llm()7worker_llm_with_tools = worker_llm.bind_tools(tools)89evaluator_llm = get_llm()10evaluator_llm_with_output = evaluator_llm.with_structured_output(EvaluatorOutput)
5.2.1. Worker Node
5.2.1.1. The Node
1defworker(state: State)-> Dict[str, Any]:2 system_message =f"""
3 You are a helpful assistant that can use tools to complete tasks.
4 You keep working on a task until either you have a question or clarification for the user, or the success criteria is met.
5 This is the success criteria:
6{state['success_criteria']}7 You should reply either with a question for the user about this assignment, or with your final response.
8 If you have a question for the user, you need to reply by clearly stating your question. An example might be:
910 Question: please clarify whether you want a summary or a detailed answer
1112 If you've finished, reply with the final answer, and don't ask a question; simply reply with the answer.
13 """1415if state.get("feedback_on_work"):16 system_message +=f"""
17 Previously you thought you completed the assignment, but your reply was rejected because the success criteria was not met.
18 Here is the feedback on why this was rejected:
19{state['feedback_on_work']}20 With this feedback, please continue the assignment, ensuring that you meet the success criteria or have a question for the user.
21 """2223# Add in the system message2425 found_system_message =False26 messages = state["messages"]27for message in messages:28ifisinstance(message, SystemMessage):29 message.content = system_message
30 found_system_message =True3132ifnot found_system_message:33 messages =[SystemMessage(content=system_message)]+ messages
3435# Invoke the LLM with tools36 response = worker_llm_with_tools.invoke(messages)3738# Return updated state39return{40"messages":[response],41}
1# helper function to simplify the output for LLM2defformat_conversation(messages: List[Any])->str:3 conversation ="Conversation history:\n\n"4for message in messages:5ifisinstance(message, HumanMessage):6 conversation +=f"User: {message.content}\n"7elifisinstance(message, AIMessage):8 text = message.content or"[Tools use]"9 conversation +=f"Assistant: {text}\n"10return conversation
1112defevaluator(state: State)-> State:13 last_response = state["messages"][-1].content
1415 system_message ="""
16 You are an evaluator that determines if a task has been completed successfully by an Assistant.
17 Assess the Assistant's last response based on the given criteria. Respond with your feedback, and with your decision on whether the success criteria has been met,
18 and whether more input is needed from the user.
19 """2021 user_message =f"""
22 You are evaluating a conversation between the User and Assistant. You decide what action to take based on the last response from the Assistant.
2324 The entire conversation with the assistant, with the user's original request and all replies, is:
25{format_conversation(state['messages'])}2627 The success criteria for this assignment is:
28{state['success_criteria']}2930 And the final response from the Assistant that you are evaluating is:
31{last_response}3233 Respond with your feedback, and decide if the success criteria is met by this response.
34 Also, decide if more user input is required, either because the assistant has a question, needs clarification, or seems to be stuck and unable to answer without help.
35 """3637if state["feedback_on_work"]:38 user_message +=f"Also, note that in a prior attempt from the Assistant, you provided this feedback: {state['feedback_on_work']}\n"39 user_message +="If you're seeing the Assistant repeating the same mistakes, then consider responding that user input is required."4041 evaluator_messages =[SystemMessage(content=system_message), HumanMessage(content=user_message)]4243 eval_result = evaluator_llm_with_output.invoke(evaluator_messages)44 new_state ={45"messages":[{"role":"assistant","content":f"Evaluator Feedback on this answer: {eval_result.feedback}"}],46"feedback_on_work": eval_result.feedback,47"success_criteria_met": eval_result.success_criteria_met,48"user_input_needed": eval_result.user_input_needed
49}5051return new_state
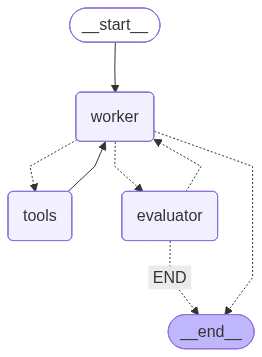
If edge function returns tools, then go to tools node (registered in line-5);
If edge function returns evaluator, then go to evaluator node (registered in line-6);
14graph_builder.add_edge("tools","worker")15graph_builder.add_conditional_edges(16"evaluator",17 route_based_on_evaluation,18{"worker":"worker","END": END}19)20graph_builder.add_edge(START,"worker")2122# Compile the graph23memory = MemorySaver()24graph = graph_builder.compile(checkpointer=memory)25display(Image(graph.get_graph().draw_mermaid_png()))
5.3. Conclusion
In LangGraph both Tools and Agents are nothing but node, they can mutate the state in whatever way we want. The mutation is defined by the dictionary returned by each node-function, where the keys are what we want to mutate in the state.
By default tool node and agent node must mutate the messages attribute in the state (common design).
When there are two agent nodes, both mutate State.messages by appending AIMessage. To distinguish them, we can see the trick in the return of the function evaluator (see 〈5.2.2.1. The Node〉):
1new_state ={2"messages":[{3"role":"assistant",4"content":f"Evaluator Feedback on this answer: {eval_result.feedback}"5}],6...7}
We put emphasis on Evaluator Feedback in the content field. Some critical message can also be passed via reassigning value into a specific field of the state (but we still need to keep it in messages if that response should be accumulated as a context).
Also note that by setting role = "assistant" in the message, it is the same as
Now we have full control on the flow of how two agents communicate, which is impossible in CrewAI that we study in week 3 of this course (should I skip it entirely as there are too many negative feedbacks on CrewAI).
Finally we determine the path of the graph depending on the edge function, which compute the condition based on the state.
6. Special Tools from LangChain
In what follows we will use the following imports: